Efficient approval processes are vital for businesses to maintain control, ensure compliance, and boost productivity. With Microsoft Dynamics 365 Business Central, you have the power to create custom approval workflows tailored to your unique requirements. Incorporating custom approval workflows into your operations empowers your organisation to streamline processes, improve control, enhance collaboration, and gain valuable insights.
In this blog post, we’ll explore the process of creating custom approval workflows in Business Central.
Introduction
We all know how to create Custom Tables and Pages in Business Central, but in case, if you are required to add an approval workflow to be setup on these Custom tables, one way is to add a custom code to the extension.
In this blog post we will learn how to enable these custom tables with the Workflow approval process.
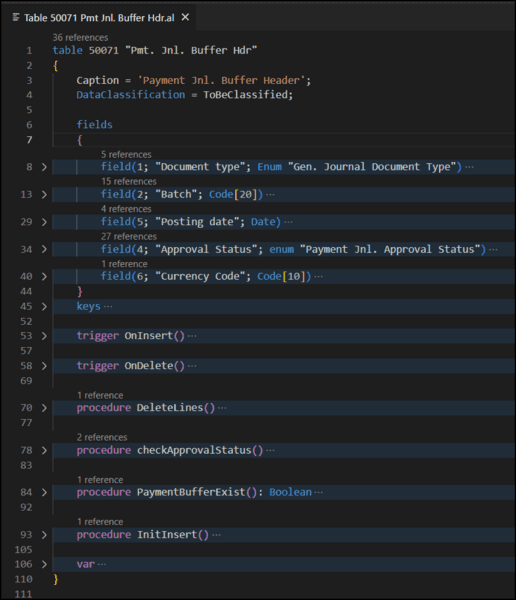
In our case, we need a customised approval workflow for our custom table “Payment Buffer”.
Pre-Requisites
- Microsoft Dynamics 365 Business Central
Steps:
- Create the Enum “Approval Status” and add the field to “Payment Buffer Card”.
- Add Send and Cancel approval request actions to handle approval request entries.
- Manage Approval status for each Batch.
- Create events for “Workflow”.
- Add events to library.
- Update Approval Entries when the approval is requested.
- Handling workflow Response
- Setup workflow for Custom Table
- Note
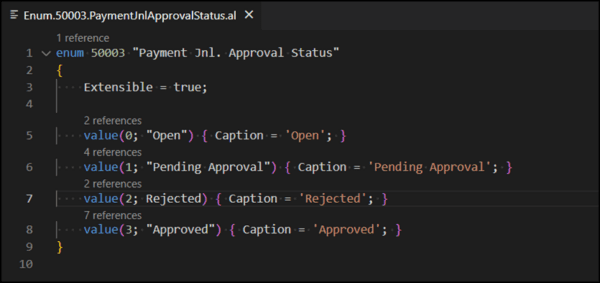
Create the Enum “Approval Status” and add the field to “Payment Buffer Card”.
Creating an Enum is now the replacement to the Options datatype, and this will be used to display the user of the current approval status in the document.
Add the field and display the same in Header page as Editable = false. The field will be non-editable, as we will be updating the status programmatically further along.
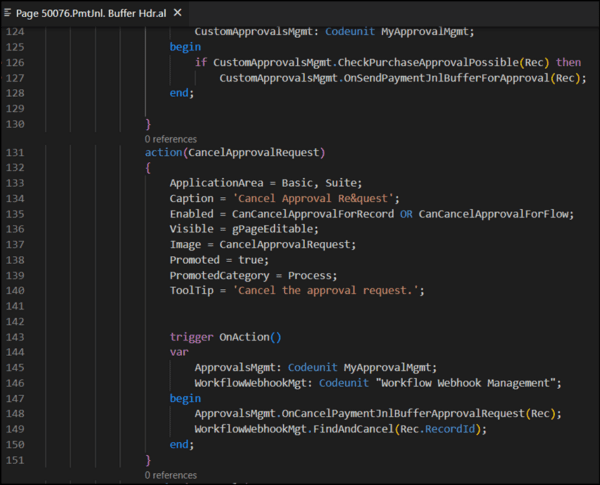
Add “Send Approval Request” & “Cancel Approval Request” buttons and update code for the same.
- Create a Custom Codeunit “Approval Mgmt” and add an events “onSentPaymentJnlBufferForApproval” and “onCancelPaymentJnlBufferApprovalRequest” to implement the action of Send approval and Cancel Approvals.
- We are going to use this codeunit to customise the approval actions further.
- Now call this event in the “Send Approval Request” & “Cancel Approval request” actions as shown below.


For controlling the visibility or action enablement based on approvals request sent or not, we will require to add code in “OnAfterGetRecord” trigger of the page as below:

Global Variables:

Create events for “Workflow”.
This is a crucial part of the Custom workflow, as the code added here will enable further processing of the approval request.
Here we are using the codeunit “CU.50067.Approval Mgmt” for ease of understanding.
If required, a new codeunit named “Workflow Event Handling Exten” could be created, as we are extending the functions of standard Codeunit “Workflow Event Handling”.
Add functions as below:
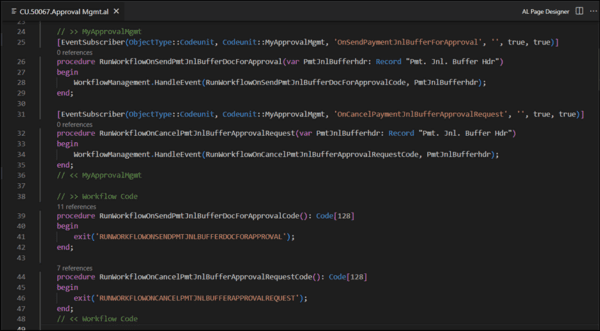
RunWorkflowOnSendPmtJnlBufferDocForApprovalCode:
This is a global function with return value as Code and length 128
RunWorkflowOnSendPmtJnlBufferDocForApproval:
This is a global function which is a Subscriber function to the publisher Integration event “OnSendPaymentJnlBufferForApproval” created earlier in “Approval Mgmt” Codeunit
RunWorkflowOnCancelPmtJnlBufferApprovalRequestCode:
This is a global function with return value as Code and length 128
RunWorkflowOnCancelPmtJnlBufferApprovalRequest:
This is a global function which is a Subscriber to publisher Integration event OnCancelPaymentJnlBufferApprovalRequest created earlier in “Approval Mgmt” Codeunit
Add events to library.
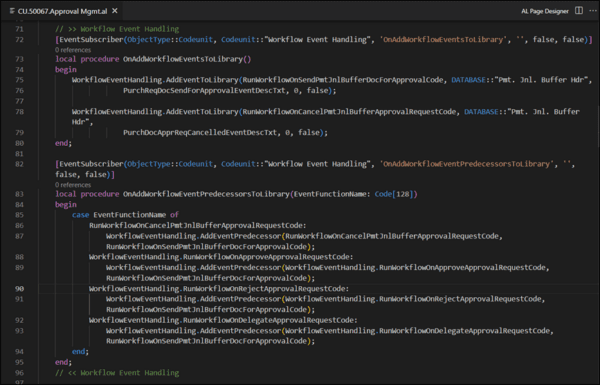
To update the new events in the “Workflow Event” Table, we need to subscribe to below functions:
OnAddWorkflowEventsToLibrary :
This is a Subscriber function to publisher Integration event OnAddWorkflowEventsToLibrary in the standard codeunit “Workflow Event Handling”.
OnAddWorkflowEventPredecessorsToLibrary :
This is a Subscriber to publisher Integration event OnAddWorkflowEventPredecessorToibrary in standard codeunit “Workflow Event Handing”
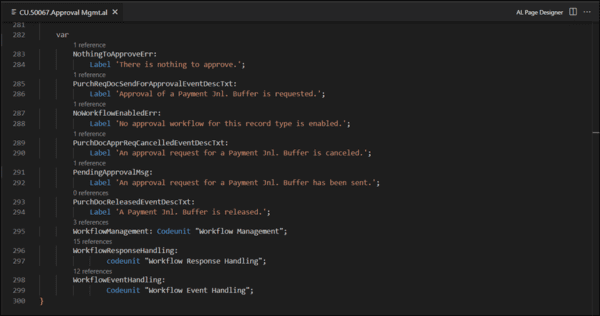
Global Variables:
Update Approval Entries when the approval is requested:
Before we proceed with handling workflow responses, we need to handle the process in the “Approval Entries” table.
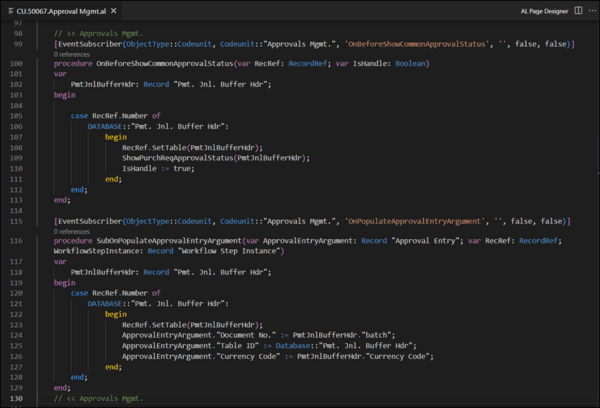
OnPopulateApprovalEntryArgument:
This is a Subscriber function to publish Integration event OnPopulateApprovalEntryArgument in standard codeunit “Approval Mgmt.”. Add code to update the Table ID and Document No. These act as a reference which can handle the approval entries later.
You can also add Currency code, Salesperson/Purchaser Code, Amount, etc in approval entries too.
Check the table structure for details.
In addition to the above, it is also required to check if approval workflow is enabled or not.
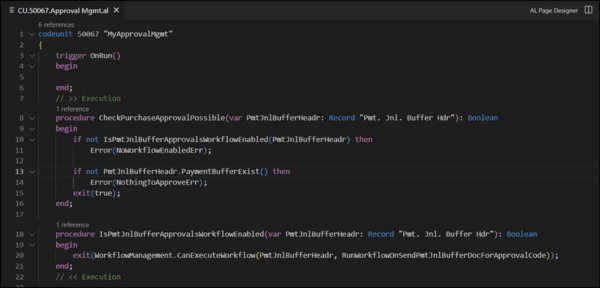
Add 2 functions “CheckPurchaseApprovalPossible” & “IsPmtJnlBufferApprovalsWorkflowEnabled” as shown below.
The function ‘CheckPurchaseApprovalPossible()’ is called the “Send Approval Request” button we discussed earlier.
Handling workflow Response
The document status must be updated in “Pmt. Jnl. Buffer Hdr” table (page) to display to the user.
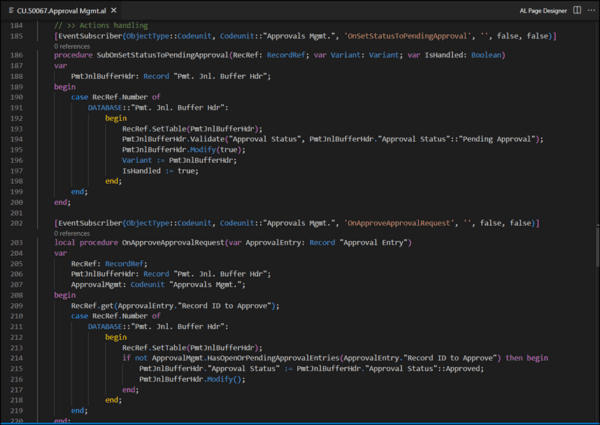
For this we need to update code in the following subscriber events
OnSetStatusToPendingApproval:
This is a Subscriber function to publisher integration event “OnSetStatusToPendingApproval” in standard Codeunit “Approval Mgmt.” codeunit. Add code here to update the values when the requester requests the approvals.
OnApproveApprovalrequest:
This is a Subscriber function to publisher integration event “OnApproveApprovalrequest” in standard Codeunit “Approval Mgmt.” codeunit. Add code here to update the values when approver approves the request.
OnOpenDocument:
This is a Subscriber function to publisher integration event “OnOpenDocument” in standard codeunit “Workflow Response Handling” codeunit.
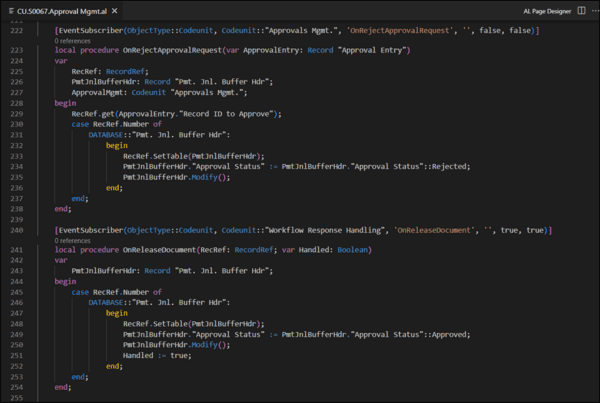
OnRejectDocument:
This is a Subscriber function to publisher integration event “OnRejectDocument” in standard codeunit “Workflow Response Handling” codeunit. Add code here to update the values when approver rejects the request.
OnReleaseDocument:
This is a Subscriber function to publisher integration event “OnReleaseDocument” in standard Codeunit “Workflow Response Handling” codeunit. Add code here to update the values when the approver approves the request and the document is released.
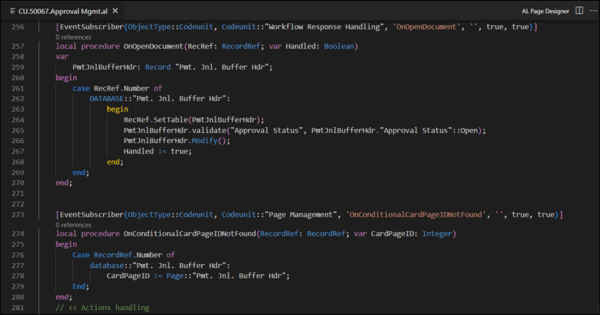
For the approver, to view the records directly from “Open Records” button in “Request to approve” page, it is necessary that the record page is referred correctly.
Create a publisher code for “Page management” codeunit, “OnConditionalCardPageIDNotFound” event. Code in above image.
It is also required to add a relation between the request/actions to the system to the response for the action.
For this, it is required to update the publisher event in Business Central standard codeunit “Workflow Response Handling”.
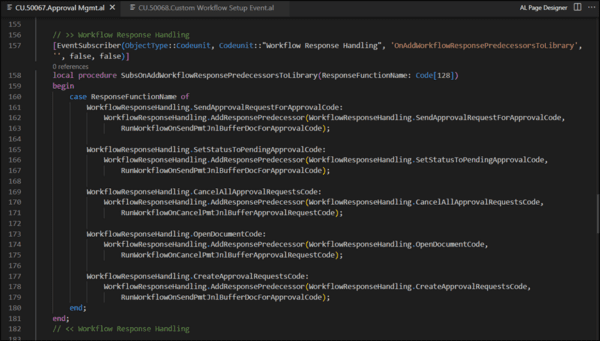
Subscribe to the event function “OnAddWorkflowResponsePredecessorsToLibrary” like below:
Setup workflow for Custom Table
Global Variable:
These are the global variables required to be added in the codeunit “Custom Workflow Setup Event”
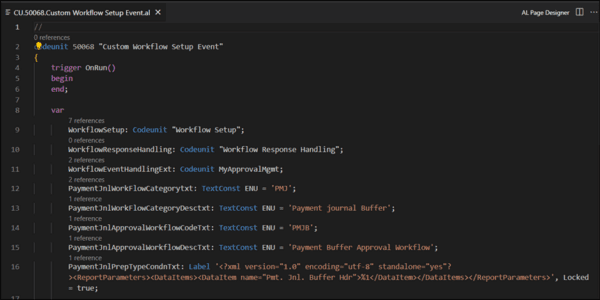
If you need to add workflow Setup automatically, it is required to add AL code to Setup “Payment Buffer Hdr” in workflow.
With the code shown belwo, a new Workflow Template is created by AL code.
Workflow templates are created through codeunit 2 (Company-Initialize) calling the function InitWorkflow from Codeunit 1502 (Workflow Setup).
Create a new Codeunit (in our case codeunit 50068) and name it “Custom Workflow Setup Event” and add below functions:
- OnAddWorkflowCategoriesToLibrary:
This is a Subscriber function to publisher integration event OnAddWorkflowCategoriesToLibrary in standard Codeunit “Workflow Setup”.
- OnAfterInsertApprovalTableRelations:
This a Subscriber function to publisher integration event OnAfterInsertApprovalTableRelations in standard Codeunit “Workflow Setup”.
- OnInsertWorkflowTemplates:
This is a Subscriber function to publisher integration event OnInsertWorkflowTemplates in standard Codeunit “Workflow Setup”.
Below 3 functions helps in creating workflow.
- InsertPaymentJnlApprovalWorkflowTemplate:
This function adds all the details with regards to workflow and mark it as Template
- InsertPaymentApprovalWorkflowDetails
This function adds the details in Workflow Step instance table. It Initializes events and responses required for the workflow.
- BuildPaymentJnlPrepTypeConditions
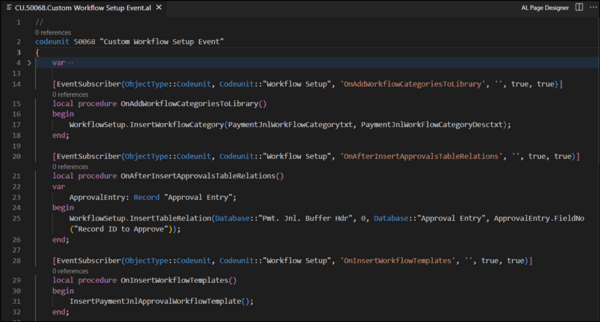
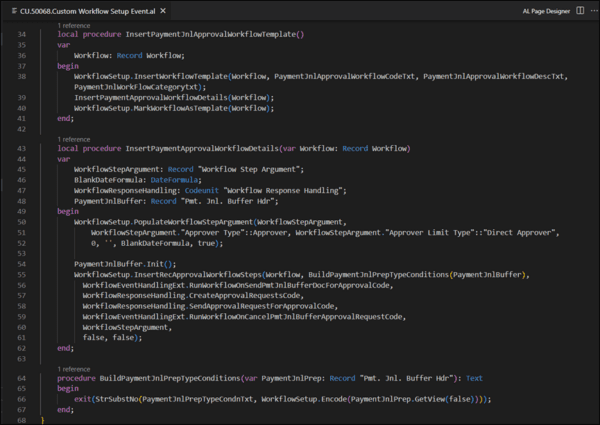
After this is done, you can publish the code and Setup the approval workflow in “Workflows” and start using approval process using Workflow user group for multiple approvers.
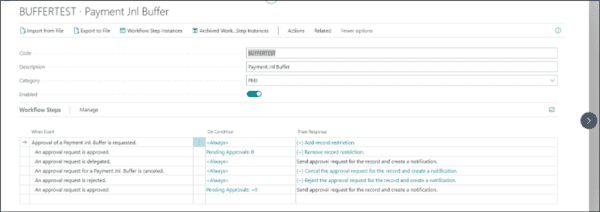
Note:
Also, keep in mind to handle situations like deletion of record and Posting of the document.
While deleting the records, that may have been rejected or cancelled, it is required to delete the approval entries, as these records are created in approval entries once the approval is requested. Below is the example for deletion of the approval entries when the document deletion is triggered.
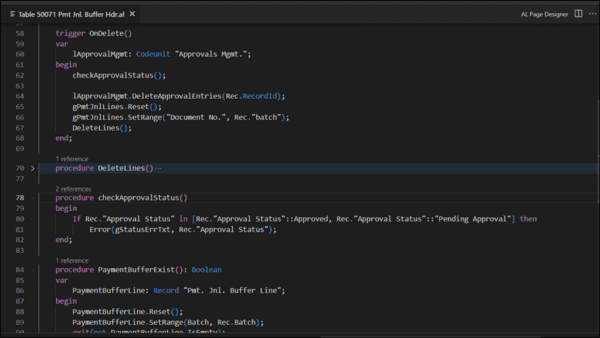
When the document is posted, a special handling is required to update the code from Approval entries to Posted Approvals Entries table. You can find the related function in standard codeunit of Approvals management.
That’s it.
We hope this blog post has been useful at explaining the process of creating custom approval workflows within Dynamics 365 Business Central. If you would like to learn more about the solution, you can read more of our blog posts here. Alternatively, if you would like to chat with us and see a demo of Business Central, please leave your details in the contact form below.


